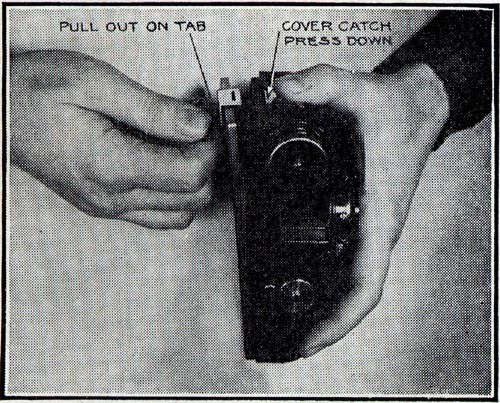
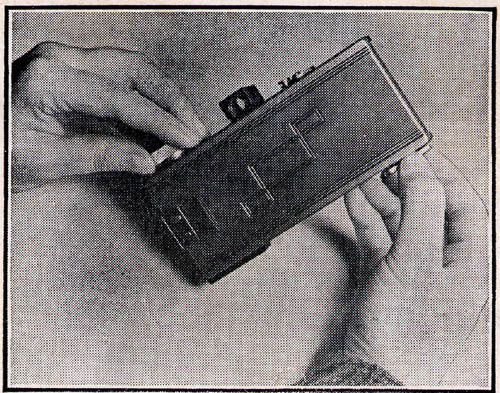
1. Remove the back cover by pressing in catch until lip clears slot on cover and pulling out on tab. (See illustration).
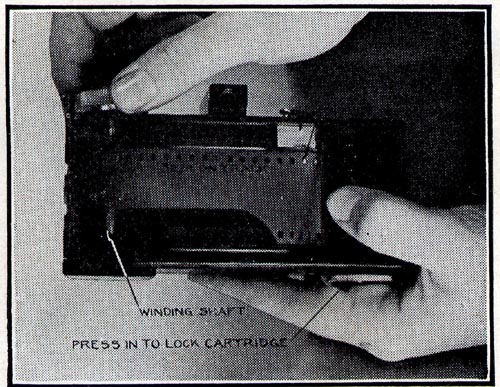
2. Pull rewind knob on bottom all the way out and insert film cartridge
in right hand compartment with keyed end of spool down. Then lock
in place by pushing in rewind knob and turn until shaft is fully engaged
on spool drive pin.
3. Pull strip of film out of cartridge and thread end through slot of
winding shaft so it projects well through the shaft. Then hold the
film snugly along the film track with the fingers and turn shaft one revolution
until end of film is bent over and film grips shat securely. (On the
films where the lower perforations are cut away on the end, care must be
taken to thread the film so it pulls level and straight along the track at
the start.)
4. After securing end of film take up any slack by turning back
the rewind knob and engage sprockets in perforations so film lies flat and
straight and the sprocket teeth remain in the perforations.
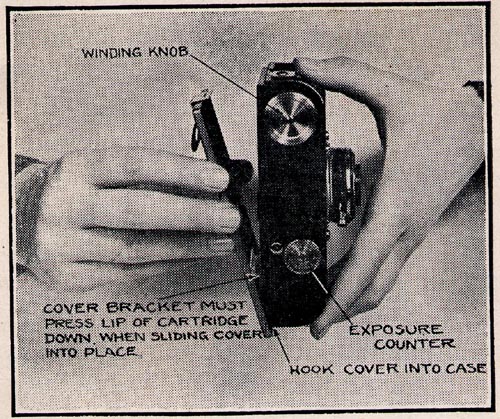
5. Next put on the back cover, sliding the cover along endwise
and seeing to it that rubber pressure pad on cover presses down on lip
of cartridge. Insert hook in case and pressing down on catch lock
cover securely.
Caution- If cover does not go down easily do not force, as
probably cartridge is not down in place and case is apt to be broken. Remove cover and repeat proper procedure.
The rubber pressure pad is merely to hold cartridge in place and must
not come in direct contact with film. Jamming and damage is sure to result
unless proper daylight cartridge is used.
6. You must now wind off the portion of film which has been exposed to
daylight. This is done by depressing the spacing button while
turning the winding shaft. The spacing button is immediately
released so that the stop will again come into action.
If
the film is properly loaded the exposure counter dial will now resolve
as the winding knob is turned. Go easy and stop turning the
moment the spacing catch locks the sprocket; then press down the
release button and wind another revolution of the counting dial.
When the film
stops you will have an unexposed portion of the film in position ready
for
taking a picture. Now set the exposure counter dial at "0" by
turning
counter clockwise. Remember to set exposure counter dial by turning
counter-clockwise after the film sprocket has locked.
TO TAKE PICTURES
Focusing Lens for Distance (18 feet to Infinity)
Turn the lens and barrel slightly until it unlocks
and springs forward. This focuses the camera for pictures beyond
eighteen feet. When in infinity position the shutter and barrel
of the camera can be rotated with ease. Make this test each time the
camera is opened. (If barrel is locked in extended position it is
focused for close-ups and not for distance.)
Focusing for Close-Ups (6 feet to 18 feet)
With lens in infinity position, turn either
way until it locks against rotation. This allows the lens to come
forward slightly and camera is now focused for anything between 6 and
18 feet.
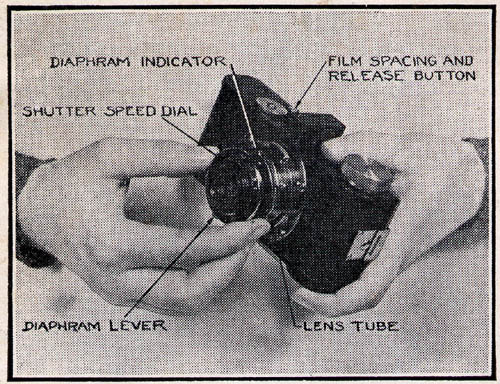
Stopping the lens down by setting the diaphragm
increases depth of focus, so that by stopping down to f6.3 clear
pictures can be made in the short focus position from 5 to 20 feet.
For closer shots use portrait attachment.
Set Shutter Speed
The speed of the shutter is set by rotating the
engraved front plate until the speed wanted is opposite the grooved
line on the metal ring just above the trigger. "25" means 1/25 of
a second, "200" means 1/200, etc.
"T" is for time exposure-the shutter opens when the trigger
is depressed and remains open until the trigger is pressed a second
time. When set at "B" the shutter remains open as long as the
trigger is held down and
closes upon release. When either "T" or "B" are used the camera
must
be held on a tripod or held firmly on a perfectly stationary object.
For
correct setting of shutter speeds see "Time of Exposure".
Set Diaphragm (Lens Opening)
CAUTION-Always note diaphragm setting before taking a picture.
The iris diaphragm regulating the aperture, or the
amount of light passing through the lens to the film, is operated by moving
the lens on the bottom of the shutter, which, in turn, moves the pointer
on top of the lens indicating the various stops.
For the correct setting of the diaphragm opening and of shutter speeds
see the table on "Time of Exposure" - or better yet, use a reliable
exposure meter.
With the camera loaded and focused, the shutter
speed and diaphragm set, you are ready to take your first picture.
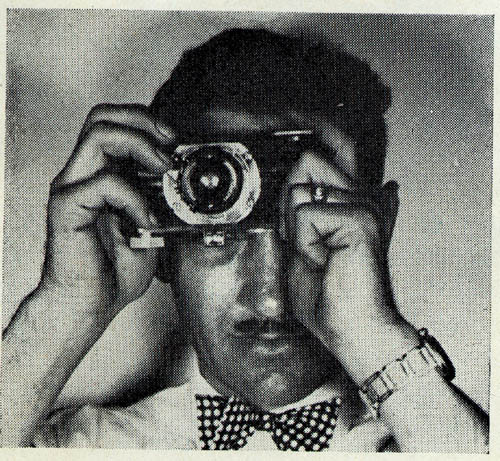
"Aim It and Take It"
Aim the camera by looking through the viewfinder and
snap the picture by pressing the trigger.
The camera should be held steady, resting against
bony structure of face, and the pressure on the trigger should be
gradual so the
camera is held as still as possible while the shutter is operating.
The secret of clear, sharp negatives with a miniature
camera is
firm holding and steady shutter release. This is especially true
when
using shutter speeds slower than 1/50 of a second. To avoid
possibility of tremor, it is always advisable to use the highest
possible shutter speed that light conditions will permit.
Illustration shows best method of
holding. Lens barrel can be turned to most comfortable position.
This
position is particularly useful in taking vertical shots.
The Argus wire cable release helps a lot in making
exposures without disturbing vibrations. Use the Argus Cable Release
with the Argus Camera! The plunger of other cables often slips
by the release lever and jams the shutter, necessitating costly repairs.
Advance the Film After Each Exposure
Immediately after taking a picture press down the
release button and turn winding knob clockwise until resistance is met
and the counter dial has revolved one revolution minus one Space.
Caution-Do
not hold down release button after counter dial starts to revolve or
the film stop will not be in operation and film will be wasted. Should
you fail to wind the film after an exposure a second picture will be
taken on top of the previous one and both pictures will be ruined.
Do not continue to turn winding knob after resistance is felt as
the sprocket is then locked and the film perforations will be torn.
When the end of a finished film is reached care must be taken not to
tear it from the spool, otherwise it cannot be rewound. To save
the films the camera would have to be opened in the dark room. So
watch the exposure counter dial.
Rewinding Finished Films
After 36 exposures, or number of exporuses provided
by length of film, rewind the film back into the daylight loading
cartridge by
turning the rewind button on the bottom of the camera clockwise.
When rewinding, back up winder knob slightly to
relieve film tension. Be sure camera is held to avoid any finger
pressure on counter wheel or winder knob.
"Speed" and "Argus" Synonymous
While the foregoing detailed description may seem
complicated, when once understood the Argus is one of the fastest
cameras in existence. When it is carried with the shutter and
diaphragm correctly set for the prevailing light conditions the camera
can be aimed, focused, and the picture snapped in less than three
seconds. You simply unlock the lens, aim the camera, and fire.
The lens comes out automatically into focus.
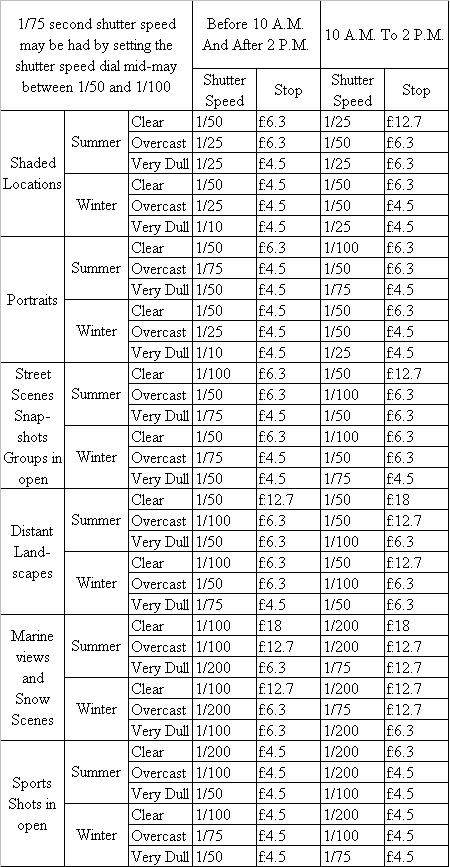
Time of Exposure
Correct timing of exposures determines the quality of
your pictures. The nearest approach to correct timing can be had through
the use of exposure meters which measure the light and give you the shutter
speeds for the various diaphragm settings and are adjustable for the different
speeds of emulsions available in motion picture film.
In the absence of an exposure meter the following table
will give fairly accurate results. It is based on use of films with
a speed rating of 24 Weston.